Storage Options
This guide describes how to use Amazon EFS and Amazon FSx for Lustre with Kubeflow.
Amazon EFS
Amazon EFS is managed NFS in AWS. Amazon EFS supports ReadWriteMany access mode, which means the volume can be mounted as read-write by many nodes. It is very useful for creating a shared filesystem that can be mounted into pods such as Jupyter. For example, one group can share datasets or models across an entire team.
By default, the Amazon EFS CSI driver is not enabled and you need to follow steps to install it.
Deploy the Amazon EFS CSI Plugin
git clone https://github.com/kubeflow/manifests
cd manifests/aws
kubectl apply -k aws-efs-csi-driver/base
Static Provisioning
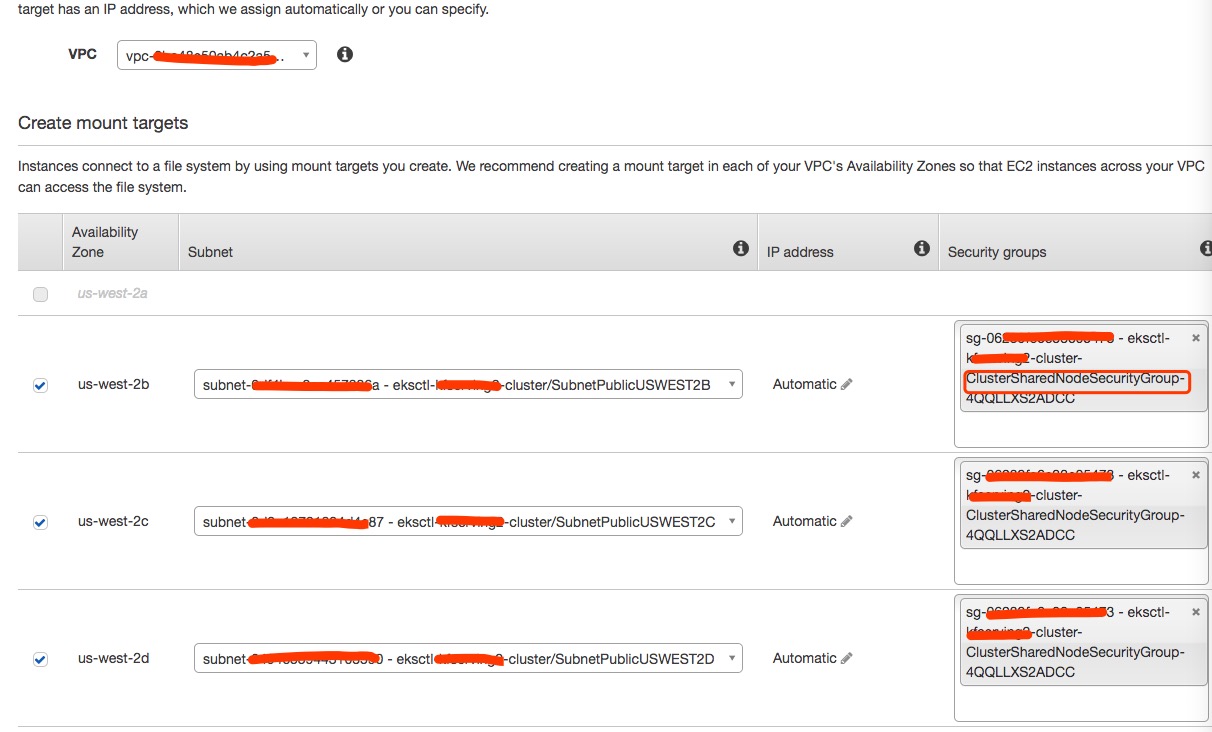
You can go to the Amazon EFS console to create a new Amazon EFS file system. Choose the VPC, Subnet IDs, and provisioning mode to use. Please pay special attention to the Security Groups, and make sure that traffic to NFS port 2049 is allowed. Then you will get a file system ID and you can use it to create persistent volumes and persistent volume claims.
For EKS user using eksctl, you can choose ClusterSharedNodeSecurityGroup.
You will need to create storage class for the first time, save as efs-sc.yaml and run kubectl apply -f efs-sc.yaml.
apiVersion: storage.k8s.io/v1
metadata:
  name: efs-sc
provisioner: efs.csi.aws.com
Replace <your_efs_id> with your efs id, save as efs-pv.yaml and run kubectl apply -f efs-pv.yaml.
apiVersion: v1
kind: PersistentVolume
metadata:
  name: efs-pv
spec:
  capacity:
    storage: 5Gi
  volumeMode: Filesystem
  accessModes:
    - ReadWriteMany
  persistentVolumeReclaimPolicy: Retain
  storageClassName: efs-sc
  csi:
    driver: efs.csi.aws.com
    volumeHandle: <your_efs_id>
Replace <your_namespace> with your namespace, save as efs-claim.yaml and run kubectl apply -f efs-claim.yaml.
apiVersion: v1
kind: PersistentVolumeClaim
metadata:
  name: efs-claim
  namespace: <your_namespace>
spec:
  accessModes:
    - ReadWriteMany
  storageClassName: efs-sc
  resources:
    requests:
      storage: 5Gi
By default, new Amazon EFS file systems are owned by root:root, and only the root user (UID 0) has read-write-execute permissions. If your containers are not running as root, you must change the Amazon EFS file system permissions to allow other users to modify the file system.
In order to share EFS between notebooks, we need to create a sample pod like below to change permission for the storage. If you use EFS for other purpose like sharing data across pipelines, you don’t need following step.
Replace <your_namespace> with your namespace, save as job.yaml and run kubectl apply -f job.yaml.
apiVersion: batch/v1
kind: Job
metadata:
  name: set-permission
  namespace: <your_namespace>
spec:
  template:
    metadata:
      annotations:
        sidecar.istio.io/inject: "false"
    spec:
      restartPolicy: Never
      containers:
      - name: app
        image: centos
        command: ["/bin/sh"]
        args:
        - "-c"
        - "chmod 2775 /data && chown root:users /data"
        volumeMounts:
        - name: persistent-storage
          mountPath: /data
      volumes:
      - name: persistent-storage
        persistentVolumeClaim:
          claimName: efs-claim
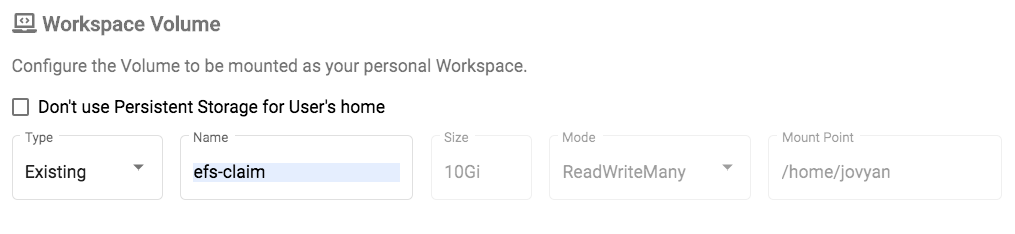
Use Amazon EFS as a notebook volume when you create Jupyter notebooks.
Amazon FSx for Lustre
Amazon FSx for Lustre provides a high-performance file system optimized for fast processing of workloads such as machine learning and high performance computing (HPC) workloads. AWS FSx for Lustre CSI Driver can help Kubernetes users easily leverage this service.
Lustre is another file system that supports ReadWriteMany. Once difference between Amazon EFS and Lustre is that Lustre could be used as training data caching layer using S3 as backend storage. You don’t need to transfer data before using the volume. By default, the Amazon FSx CSI driver is not enabled and you need to follow steps to install it.
Deploy the Amazon FSx CSI Plugin
Make sure your node group instance has right permission. Check details here.
git clone https://github.com/kubeflow/manifests
cd manifests/aws
kubectl apply -k aws-fsx-csi-driver/base
Static Provisioning
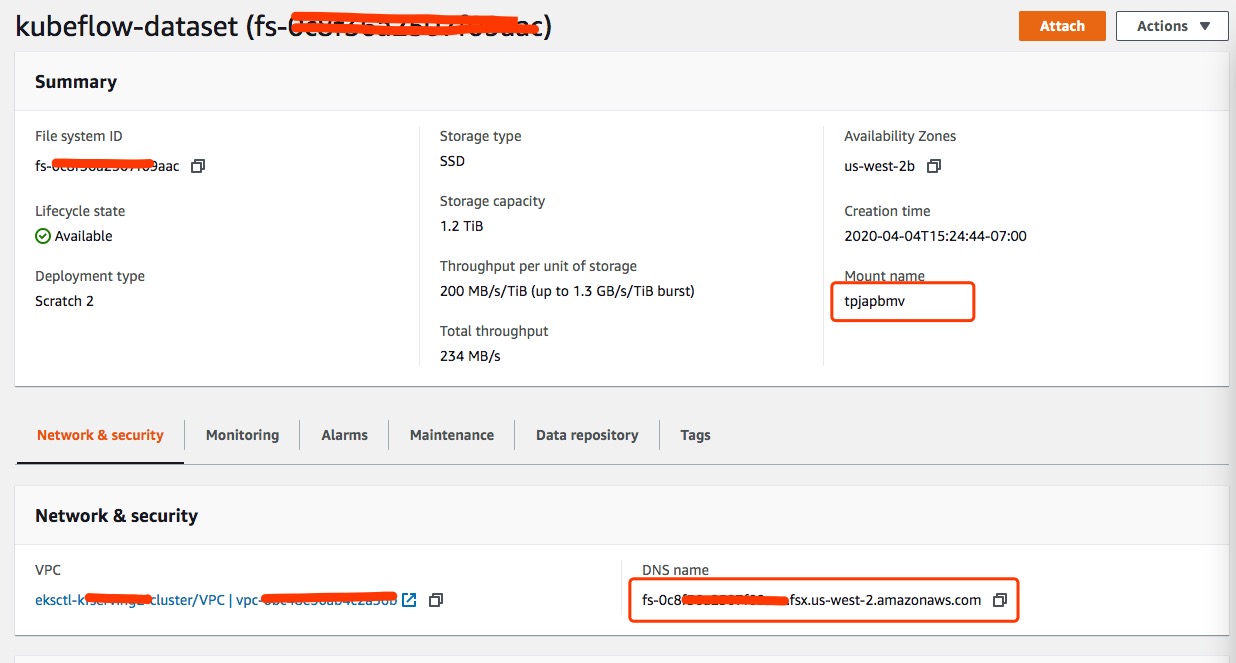
You can statically provision Amazon FSx for Lustre and then pass the file system ID, DNS name and mount name, to generate persistent volumes and persistent volume claims.
You can choose deployment type based on your needs. Check more details here.
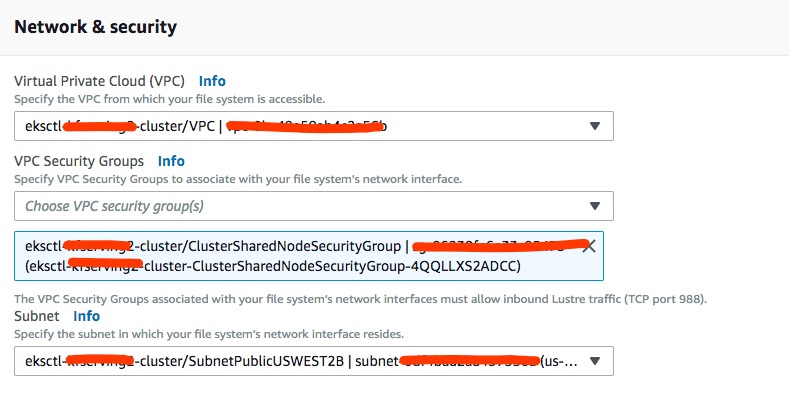
FSX only supports single availability zone. Choose the right subnet based on your node group setting.
After you finish creating a FSX for Lustre file system, you will have everything you need to create Persistent Volumes and Persistent Volume Claim. File System ID, DNS Name and Mount Name will be used later.
Save following manifest as yaml files and run kubectl apply -f <file_name>.yaml
apiVersion: v1
kind: PersistentVolume
metadata:
  name: fsx-pv
spec:
  capacity:
    storage: 1200Gi
  volumeMode: Filesystem
  accessModes:
    - ReadWriteMany
  mountOptions:
    - flock
  persistentVolumeReclaimPolicy: Recycle
  csi:
    driver: fsx.csi.aws.com
    volumeHandle: <your_fsx_volume_handle>
    volumeAttributes:
      dnsname: <your_fsx_dnsname>
      mountname: <your_fsx_mountname>
apiVersion: v1
kind: PersistentVolumeClaim
metadata:
  name: fsx-claim
  namespace: <your_namespace>
spec:
  accessModes:
    - ReadWriteMany
  storageClassName: ""
  resources:
    requests:
      storage: 1200Gi
  volumeName: fsx-pv
Once your persistent volume claim is ready, you can claim in your workloads like this:
...pod template ...
    volumeMounts:
    - name: persistent-storage
      mountPath: /data
  volumes:
  - name: persistent-storage
    persistentVolumeClaim:
      claimName: fsx-claim
Dynamic Provisioning
You can dynamically provision Amazon FSx for Lustre filesystems for your high performance computing workloads in the following way. The SecurityGroupId and SubnetId are required. Amazon FSx for Lustre is an Availability Zone based file system, and you can only pass one SubnetId here. This means you need to create a cluster in single Availability Zone, which makes sense for machine learning workloads.
If you already have a training dataset in Amazon S3, you can pass your bucket name optionally and this will be used by Amazon FSx for Lustre as a data repository and your file system will be ready with the training dataset.
Check dynamic provisioning example here.
Feedback
Was this page helpful?
Glad to hear it! Please tell us how we can improve.
Sorry to hear that. Please tell us how we can improve.