Authentication and Authorization
This section shows the how to setup Kubeflow with authentication and authorization support in Amazon Web Services (AWS).
Manifest
In order to simply your setups, we highly recommend you to use this manifest. https://raw.githubusercontent.com/kubeflow/manifests/v1.0-branch/kfdef/kfctl_aws_cognito.v1.0.2.yaml
Traffic Flow
External Traffic → [ Ingress → Istio ingress gateway → Istio virtual services ]
When you generate and apply kubernetes resources, an ingress is created to manage external traffic to Kubernetes services. The AWS Appliction Load Balancer(ALB) Ingress Controller will provision an Application Load balancer for that ingress. By default, TLS and authentication are not enabled at creation time.
Kubeflow uses Istio to manage internal traffic. In AWS solution, TLS, authentication can be done at the ALB and and authorization can be done at Istio layer.
Enable TLS and Authentication
Right now, certificates for ALB public DNS names are not supported. Instead, you must prepare a custom domain. You can register your domain in Route53 or any domain provider such as GoDaddy.com.
AWS Certificate Manager is a service that lets you easily provision, manage, and deploy public and private Secure Sockets Layer/Transport Layer Security (SSL/TLS) certificates for use with AWS services and your internal connected resources.
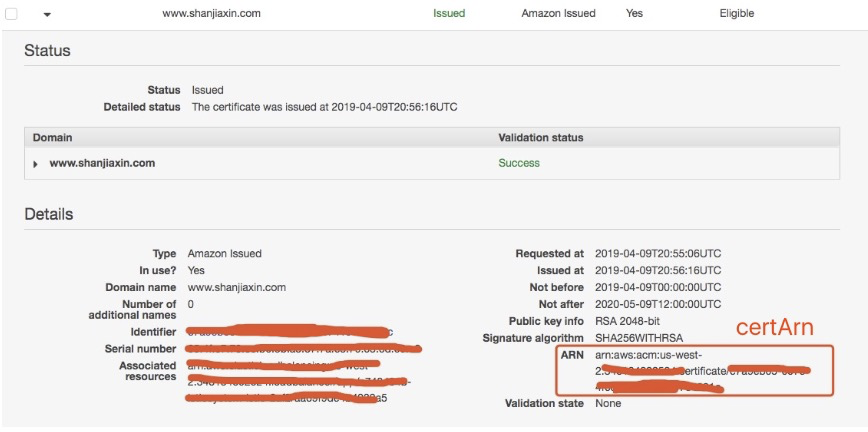
To get TLS support from the ALB Ingress Controller, you need to follow this tutorial to request a certificate in AWS Certificate Manager. After successful validation, you will get a certificate ARN to use with the ALB Ingress Controller.
Note: Even you need to create a
certificate ARN, we don’t necessarily need a custom domain unless you want to use it, you can still use ALB ingress hostname to visit kubeflow central dashboard.

AWS Cognito lets you add user sign-up, sign-in, and access control to your web and mobile apps quickly and easily. Amazon Cognito scales to millions of users and supports sign-in with social identity providers, such as Facebook, Google, and Amazon, and enterprise identity providers via SAML 2.0.
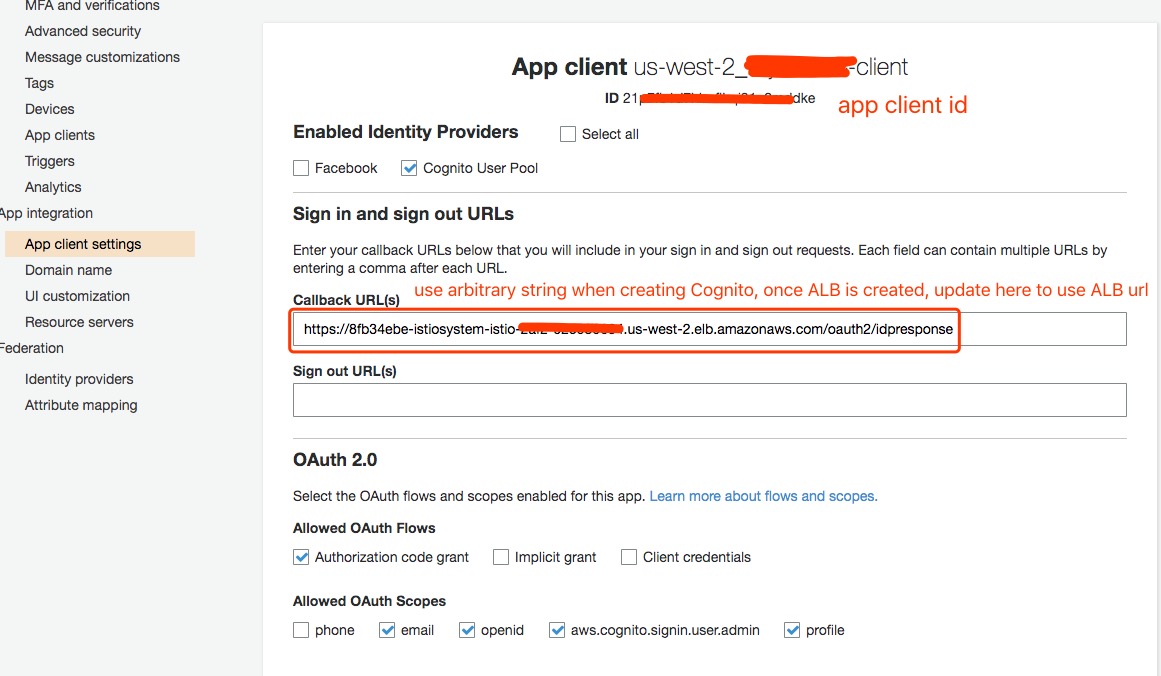
In order to authenticate and manage users for Kubeflow, let’s create a user pool. The authorization code grant is the preferred method for authorizing end users. Instead of directly providing user pool tokens to an end user upon authentication, an authorization code is provided. This code is then sent to a custom application that can exchange it for the desired tokens. Because the tokens are never exposed directly to an end user, they are less likely to become compromised. You can follow instructions below.

For the callback URLs field, if you don’t want to use custom domain, you can use ALB hostname for testing. You will see some Not Secure warning in browser because ALB hostname doesn’t match with domain name in your ACM certificate. It’s still functionally working. We will use ALB and please check section to setup custom domain.

Once a user pool created, we will have a UserPoolId, a Cognito Domain name, and a Cognito Pool Arn.
Before you kfctl apply -V -f ${CONFIG_FILE}, please update Cognito spec in your Kubeflow
configuration file at ${CONFIG_FILE}, so that it looks like this:
plugins:
    - name: aws
      spec:
        auth:
          cognito:
            cognitoUserPoolArn: arn:aws:cognito-idp:us-west-2:xxxxx:userpool/us-west-2_xxxxxx
            cognitoAppClientId: xxxxxbxxxxxx
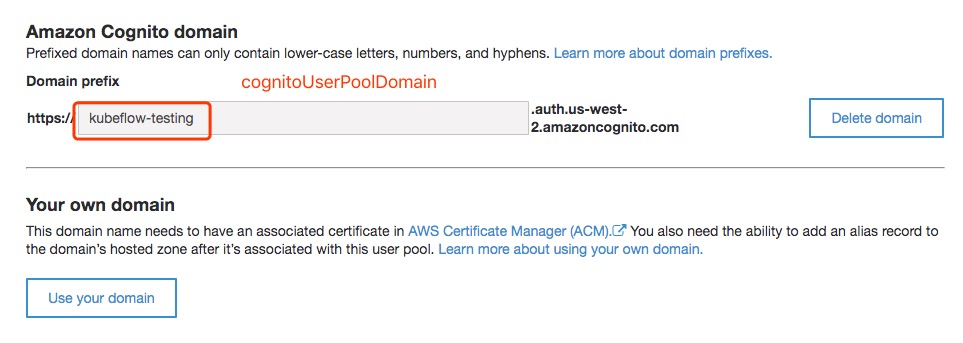
            cognitoUserPoolDomain: your-amazon-cognito-domain
            certArn: arn:aws:acm:us-west-2:xxxxx:certificate/xxxxxxxxxxxxx-xxxx
      ....
Note: You can use your own domain for
cognitoUserPoolDomain. In this case, we just use Amazon Coginito domainkubeflow-testing. If you use your own domain, please check aws-e2e for more details.
After you finish the TLS and Authentication configuration, then you can run kfctl apply -V -f ${CONFIG_FILE}.
After a while, your ALB will be ready, you can get ALB hostname by running follow command.
kubectl get ingress istio-ingress -n istio-system
NAME            HOSTS   ADDRESS                                                                  PORTS   AGE
istio-ingress   *       a743484b-istiosystem-istio-2af2-1092604728.us-west-2.elb.amazonaws.com   80      4h9m
Update your callback URLs.

Then you can visit kubeflow dahsboard using your ALB hostname.

Enable Authorization
kfctl_aws_cognito.yaml by default set clusterRbacConfig to ON which enables istio RBAC for all services. When user create Kubeflow Profile like below, besides kubeflow-user namespace, an istio ServiceRole and ServiceRoleBinding will be created for RBAC.
apiVersion: kubeflow.org/v1
kind: Profile
metadata:
  name: kubeflow-user
spec:
  owner:
    kind: User
    name: kubeflow-user@amazon.com
The ServiceRole ns-access-istio is created and it allows user to access all the services in that namespace. ServiceRoleBinding owner-binding-istio define subject like beflow. Only request with header kubeflow-userid: kubeflow@amazon.com can have pass istio RBAC and visit the service
subjects:
  - properties:
      request.headers[kubeflow-userid]: kubeflow-user@amazon.com
After ALB load balancer authenticates a user successfully, it sends the user claims received from the IdP to the target. The load balancer signs the user claim so that applications can verify the signature and verify that the claims were sent by the load balancer. Applications that require the full user claims can use any standard JWT library to verify the JWT tokens.
Header x-amzn-oidc-data stores user claims, in JSON web tokens (JWT) format. In order to create a kubeflow-userid header, we create aws-istio-authz-adaptor which is an isito route directive adpater. It modifies traffic metadata using operation templates on the request and response headers. In this case, we decode JWT token x-amzn-oidc-data and retrieve user claim, then append a new header to user’s requests.
Check Enable multi-user authorization for AWS for more technical details.
Feedback
Was this page helpful?
Glad to hear it! Please tell us how we can improve.
Sorry to hear that. Please tell us how we can improve.